VIEW ALL HOW-TO GUIDES
How To Estimate The Time To Complete A Route
ADVERTISEMENT
More How-To Guides
- How to bookmark your favourite places
- How to change your email address and password
- How to share private routes with only selected people
- How to join together two or more routes
- How to add labels and symbols to a route map
- How to correct map errors
- How to trace over other routes
- How to share a route map
- How to import a route mapped elsewhere
- How to make a route private or public
Watch Our Video Tutorials
We have a number of video tutorials demonstrating how to use key features on the site.
VIEW TUTORIALS
VIEW TUTORIALS
Join In Our Forums
Take at look at our Forums for more help and advice.
VIEW FORUMS
VIEW FORUMS
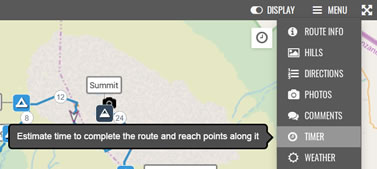
If you want to estimate how long it will take to complete a route on plotaroute.com, or to reach various points along it, you can do this using the Route Timer feature. Follow these instructions:
- View the route.
- Select 'Timer' from the menu above the map (or click the Timer icon on the map).
- Choose the Timer Settings as follows:
- For (walking, running, cycling, horse riding)
- Flat Speed/Pace - this is how fast you normally go on a flat surface
- Speed Taper - gradually reduces your speed over the route by a specified percentage
- Start Time - set this to estimate what time of day you will finish, otherwise leave as 00:00
- Include Stops - include any Stops that were saved with the route when estimating times (see note below)
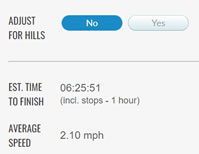
- Adjust for Hills - takes into account the effect of hills when estimating times
- The Estimated Time to Finish and your Average Speed/Pace will be displayed below these settings:
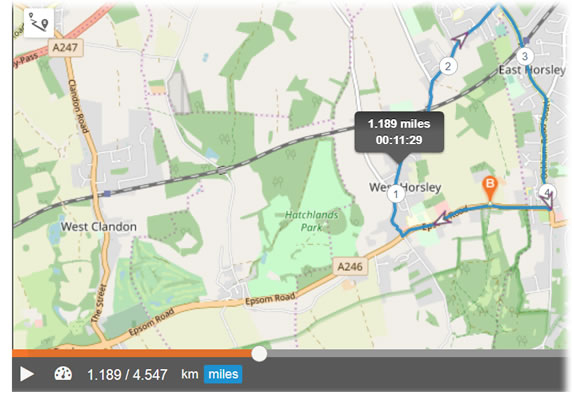
- When you close the Route Timer panel, you can also see the estimated time to complete the route on the map. Clicking on this will bring you back to the Route Timer settings.
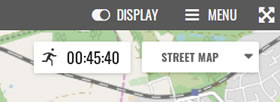
- You can see the estimated time at points along the route by using the playback controls (click Play or drag the playback slider).
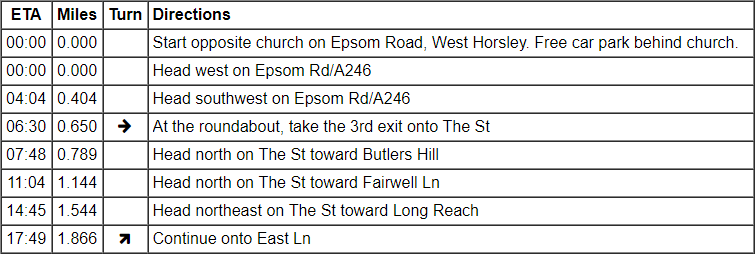
- If the Route Timer is turned on when you Print a route, each route direction will include an Estimated Time of Arrival.
- Editing Stops - If you want to add or alter any Stops along the route, you can do this by editing the route in the route planner (select Edit from the menu when viewing a route). Stops are added in the Directions panel (click DIRN'S from the map menu in the route planner to access this).
- Advanced Settings - There are some further settings that you can use to adjust the degree of compensation for hills. To access these click the Advanced Settings button in the Timer panel.
The Route Timer estimates times using a variation of Naismith's rule for estimating walking times. This uses an average speed on the flat ground as a baseline and then makes adjustments for hills, reducing your average speed while going uphill and increasing your average speed when going downhill. Adjustments can also be made for very steep downhill stretches, which can cause a speed reduction if greater caution is needed on steep gradients.
Default settings have been set up for each type of activity but you can change these based on your own personal experiences to improve the accuracy of the time estimates.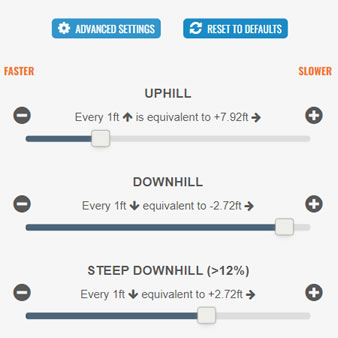
The above instructions explain how to use the Route Timer when viewing a saved route but you can also use the Route Timer feature in the route planner as you are plotting a route.
Share this page:
DESKTOP TABLET MOBILE